Feeds:
Posts
Comments

Archive for the ‘Cakes and pies’ Category

Another one of boyfriend’s wishes. He loves the Bienenstich-cake from my bakery, and so, I gave it a shot at making this deliciousness myself, too. The cake turned out to be yummy (made it last week), but in the process I discovered something more to my liking. From the excess dough I made a few round pieces and coated them with the almond mixture as well. That was delicious! So, decided to name them Bienenenstichtaler, taler usually referring to a round baking here in Germany.

Something of these reminds me of the Tosca-cake, I know from Finland, though it’s typically made with a sugar cake basis. For these round cakes, I used yeast dough, and I must say it works. Not being too sweet, something that Tosca-cake can easily turn into, these Bienenstichtalers leave open the possibility of cutting them in half and filling them with whipped cream and berries or vanilla custard.

Yeast cakes

Bienenstichtaler (10 pcs)

200 g   lukewarm milk
1   egg
50 g   sugar
2 ts   vanilla sugar / couple drops of vanilla aroma
2 g   salt
20 g   fresh yeast
375 g   all-purpose flour
50 g   butter, room temperature

For the filling:
180 g   butter
180 g   sugar
18 g   glucose syrup / golden syrup
18 g   honey
70 g   cream

+ 180 g of almond in different forms (sliced, slivered, crushed) or why not other nuts, too. I decided to go for some sliced hazelnuts as well, as I found them on offer.

1. Warm up the milk ’till lukewarm and dissolve the yeast into it. Mix together with sugar, salt, egg and vanilla aroma.

2. Add the flour in couple batches kneading well all the time. Add the butter after a while of kneading. Knead ’till the dough starts to come off from the edges of the bowl and you have obtained a smooth dough.

3. The dough will be quite loose, but don’t worry. Will result into soft yummy cakes! So, cover the dough and let it proof for 30 minutes or so.

4. Once the dough has proofed, pour it onto a floured working table. Dust the top with a little bit of flour and divide into 10 equal pieces (about 75g each). Form the pieces round and roll out into circles (12 cm). Divide onto two baking papers, and leave to proof covered with a cloth.

5. Prepare the filling. Measure all the filling ingredients into a pot, not the almonds, and bring to boil, stirring occasionally. Once boiling, let the mixture boil for about 5-7 minutes. The ideal temperature for the filling would be 112°C, so if you have a cooking thermometer, now is a great change to use it. The mixture should thicken and turn golden yellow, but not brown.

6. Having cooked, remove the mixture from the heat and mix in the almonds. Leave the mixture to cool. It ought to cool so that it doesn’t kill the yeast activity, but is still smoothly spreadable. So, warm to the touch, but not burning your fingers.

7. Once the mixture has cooled, dimple some holes into the yeast cakes with a fork, and divide the filling onto them. Spread the filling across the basis, and cover the cakes again with a cloth.

8. Heat up the oven to 210°C. Once warm, bake the yeast cakes in two batches in the center of the oven for about 10-15 minutes ’till equally golden brown.

9. Let the yeast cakes cool down a bit, before biting into them. Yum yum!

Bienenstichtaler

-Marika

openThe Free Dictionary: Affording unobstructed entrance and exit; not shut or closed.

Read Full Post »

Been enjoying the summer for a week and summer bakings to go with it. Made chicken salad and my favorite Bread with bubbles. Made also the ultimate meringue cake, pavlova, to celebrate the beginning of the berry season.

Pavlova

Pavlova

6 egg whites
2+1 dl sugar
2 ts corn starch

2 dl whipped cream
sugar
bunch of fresh berries (raspberries, strawberries, blueberries, blackberries and such)

1. Beat the egg whites ’till stiff. Add 2 dl of the sugar little by little, mixing all the time. Mix the rest of the sugar with the corn starch and mix in like before.

2. Spoon the meringue onto a baking tray covered with baking paper. Form a circle (about ⌀ 30cm), leave the edges a bit higher than the middle. Sprinkle a bit of sugar on top of the meringue.

3. Bake in 125°C in the middle of your oven for 90 minutes. Keep an eye on the meringue, so that it doesn’t get too brown and turn down the heat in case needed. The ready meringue should be crispy outside and moist inside. Let the meringue cool down. I decorated my meringue with some melted chocolate, and having a bit of chocolate flavor worked deliciously in the combination.

4. Whip the cream, spice gently with sugar and spread over the meringue. Clean the berries, cut smaller if needed and scatter over the whipped cream.

5. Enjoy tremendously, summer is here ❤

Berries

About time

Marika~

Read Full Post »

Carrot bunnies

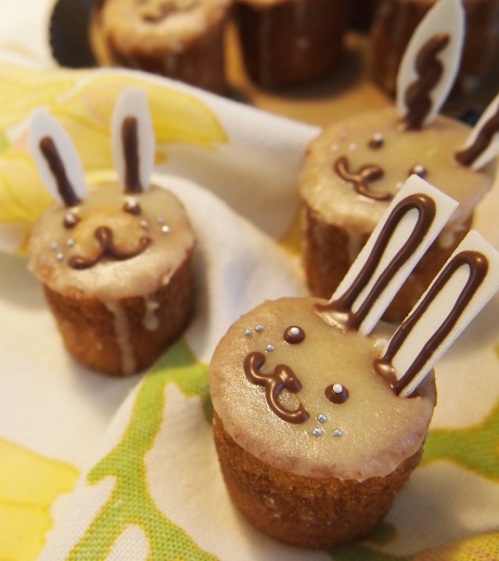
Perhaps I didn’t make enough ginger breads this Christmas after all, for I had to take upon another arts and crafts project. Bunnies! They are carrot muffins, made with the recipe for Bunny Mother’s Carrot Cake. Chocolate for the face, baking wafers (quite common here in Germany, a bit like eatable paper kind of material) for the ears and some nonpareils for detailing. Cuteness!

Is so fluffy!

All unique

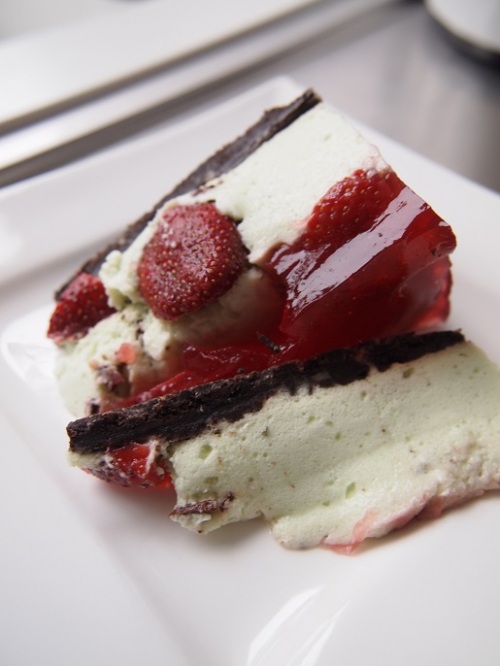
Other things didn’t turn out that photogenic. Made finally the Oreo-mint cake I’ve been dying for. Brought some mint jelly with me from Finland. Anyway, that alone didn’t seem to give enough minty flavor for the cake filling, so I crushed in some mint chocolate, too. That surely helped, turned out yummily minty. Got some strawberries from work so I decorated the cake with them. They made the cutting of the cake a bit tricky, but oh well.. Here it is.

Mint and strawberries

The other not-so-cute-cute-thing, were my big bunny rolls. Turned out to be real French lops. Perhaps I haven’t seen enough other kinds of bunnies, so these are the only ones I can do.

French

Marika~

Read Full Post »

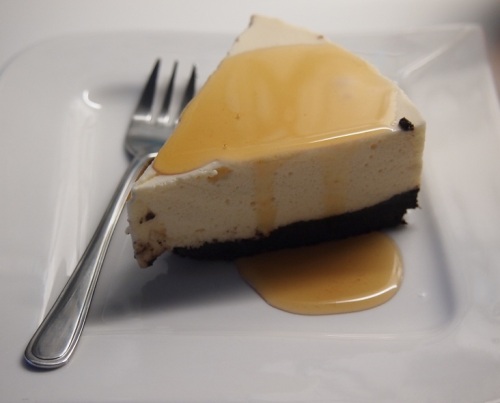
I created a cheesecake. Well, if it can be called a cheesecake. It’s the kind of fridged cake with gelatine. Maybe the word mousse cake would describe it better.  Well, whatever it is, it turned out super! I’m quite the gelatine master and I think with gelatine you can make cake filling with any flavor. I decided to go for mint. My original idea was to make cheesecake with Oreo-cookies bottom and mint mousse filling. The only problem was, I couldn’t find any mint. After wondering what else might go with Oreos, I decided to go for Canada’s Best Maple Syrup. And so, here it is – Canada’s Best Cheesecake. Apologizes for the lack of pictures, only this last piece was still standing when I got to the photo-shooting part.

Canada's Best Cheesecake

Canada’s Best Cheesecake (my cake pan is ⌀ 20cm)

175g   Oreo-cookies
60g   Margarine

2   egg whites (large)
4   gelatine leaves (mine are 12 to 1l of liquid, also you need enough gelatine for about 3 1/3dl of liquid)
2   egg yolks
100g   maple syrup
150g   cream cheese, unflavored
200g   whipping cream

1. Crush the cookies well (with filling). Melt the margarine. Add the melted margarine into the cookie crumbs and mix together. Place a piece of baking sheet on the bottom of a round cake pan (about ⌀ 20-24cm, with removable bottom) and tap the cookie mixture evenly in. Refrigerate.

2. Place the gelatine leaves into cold water. Separate the egg yolks and whites into two bowls. Foam the egg whites really fluffy. Add the maple syrup and cream cheese into the egg yolks and whisk lightly ’till smooth.

3. Whip the cream. Bring some water to boil. Take the gelatine leaves out of the cold water and squeeze dry. Place them into a cup and add about 1/2dl boiling water on them. Mix ’till dissolved. Add the dissolved gelatine into the yolk-syrup-cheese mixture mixing all the time.

4. Then add the whipped cream and mix ’till even. Finally fold in the foamed egg whites. Pour the mixture onto the cookie bottom and fridge for overnight, or at least 5 hours ’till solid. Remove the ring, cut the pieces and enjoy with some more maple syrup. Absolutely delicious, and so fluffy. Love the structure!

Marika~

Ps. Got to be also a confectioner in my bakery today. Was nice, though quite dangerous, when one can eat all the little leftover cake edges and ruined Berliners. Mmmm.. Can’t wait to do that again!

Read Full Post »

Older Posts »